


What’s a Divi Visual Builder?
The Divi Builder includes two types: the “Back-end Builder” default and also the “Visual Builder” front-end. Both configurations help us build precisely the same kinds of websites with about the same design and elements settings. The only thing different here is the gui. The Back-end Builder exists within the WordPress admin area and can be configured like all other normal WordPress environments. It sits within the WordPress User interface and covers the regular WordPress post editor. It’s perfect for making fast adjustments when you’re inside the wordpress dashboard, but it’s also limited to the dashboard and made as a block-based depiction of your site. This guide would only concentrate upon this visual builder.

The new Divi Visual Builder, in the other side, helps you to create your pages on the front end of your site! It’s a great experience and makes for a much quicker design. As you can add content or modify the layout settings within the Divi visual builder, the adjustments will appear immediately. You could click on the tab and start to type in. You could highlights content and change the style and font of the text. You could add new posts, create your website, and see everything that happens right in front of your face.
The Cyber Monday sale has officially begun! For a very limited time, Divi are offering our biggest discount of all time plus free bonus gifts and exclusive perks...and that's just the beginning! Once Cyber Monday is over, this crazy deal won't be back until next year Divi Theme Discount today!

Activate the Divi Visual Builder
While signed in to your WordPress admin area, you can browse to any page on the front end of your site and press the “Enable Visual Builder” key in the WordPress dashboard bar to start a visual builder.
When you are editing your WordPress page on the back-end, you could turn to the Visual Builder by pressing the “Enable Visual Builder” icon in the top of the Divi Builder back-end interface (remember that you should already enable the Divi Builder first before Visual Builder key appears).

The Fundamentals of Visual Builder
The strength of Divi comes in the Visual Builder, a drag-and-drop WordPress page builder that makes it easy to create almost any kind of websites by integrating and organizing content elements.
The builder contains three main basic components: rows, sections and modules. Combining these in unison helps you to create an infinite variety of page templates. Sections are the biggest building elements, and sets of rows are housed. Rows are placed within parts and used to house modules. The modules are put within the rows. This will be the construction of a any Divi site.
Section
Most important and biggest basic components used in the design of the Divi layouts are sections. They are being used to build huge groups of website content, and section is the first element you add to your website. There are three different types of sections: standard, special and full-width. Standard sections are usually made of rows of columns, and Full Width Sections are composed of full width modules that span the full width of the display. Specialty sections make further advanced layouts of the sidebar.
Rows
Rows are placed within sections and you can put any amount of rows within a section. There are several different types of columns can choose from. If you have established the structure column to your row, you could place the modules in the desired column. There is also no limit on the amount of modules that can be put in a column.
Modules
Modules are the website content parts that set up your site. Every Divi module suit into every column width, and all of them are completely responsive.
Building the First WordPress Page
You can use the three basic elements (Sections, Modules and Rows ) to create your website.

Adding The First Section
You will need to insert a section first so you can add something to your website. Sections could be inserted by clicking on the blue (+) key. Once you hover over a section which already appears on the website, a blue (+) icon appears below it. When clicking it, a new section will be inserted below the section you are already hovering over.
If you start a brand new web page, your first section should be set directly.

Adding The First Row
Once you have created your first section, you could add additional rows of columns within it. A section can contain any amount of rows, so you can mix it up rows of various column types to make a variety of designs.
To create a row, hit the green (+) key within any blank section, or press the green (+) key that occurs when you hover over every current row to create a new row under it. If you press the green (+) key, you should be welcomed with a number of columns types. Choose any column you like, and then you’re able to add the first module.

Adding the first module
Modules can be inserted within rows, and any amount of modules could be stored in each row. Modules are the contents of your web page, and Divi arrives with over 40 various elements which you can use to develop with. You could use simple modules like Images, Text and Buttons, or even more advanced modules such as Portfolio Galleries, Sliders and eCommerce Shops. They have specific guides for each Divi module, so if you’d like to know more about the kinds of modules that Divi offers, and be sure to go back to the main Divi document page on ElegantThemes website and search the “Modules” section.
To insert a module, press the Gray (+) key that appears within any blank column, or press the Gray (+) key that occurs when you hover over the module on the web page to create a new module under. If you press the button, you will be welcomed with a list of modules. Choose the module you want and it’ll be placed to the page and the module settings screen will appear. You can start setting your module by using settings section.

Setting and designing Sections, Module and Rows
Every section, module and row can be configured in a variety of ways. You can reach the settings panel of an element by pressing on the gear icon that appears when you hover over any component on the tab.

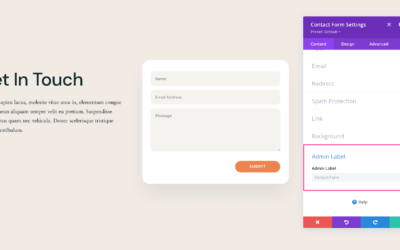
It will start the settings panel for the defined element. Every setting panel is separated into three tabs: Design, Content, and Advanced. Every tab is intended to make it simple and easy to reach and change Divi’s wide range of settings. The content tab is, of course, where you can create website content such as photos, videos, admin labels and links . The Design tab is where we set all the builtin design configurations of every element.
Based about what you’re editing, you can use a click to monitor a wide range of design options, such as: spacing (padding / margin), typography, button types, and more. For the in-depth look at the Design tab, take a closer look at Divi at ElegantThemes website tutorial on Design settings.
At last, if you really want even more power, you can go to the Advanced tab which you can add custom CSS, change device-based visibility, and (obviously it depends on which feature you’re editing) do more fine tuning.
Save The Page and Manage Page Settings
Press the purple dock button at the bottom of the screen to reach the general page configuration. This will extend the configurations bar and give you extra a range of choices. You can open the settings of your page by clicking the settings icon. Then you can change the color of the page background and the color of the text. You’ll also see the Save and Publish keys and also the responsive preview buttons.

Move-start the design using your pre made layouts
A perfect way to jump-start your new webpage is to start everything with a pre-made design layout. Divi Builder packages with over 800 pre-made layouts that includes a lot of different page styles, like “Contact,” “About Us,” “Blog,” “Portfolio,” and so on. You could set these up and thereafter switch the sample content with your own material. Your current page is coming to an end before you realize it!

Save your own designs to the library
In addition with using pre-made layouts that brought by Divi, you could also save your own designs layouts in the Divi Library. When a layout is stored in the Divi Library as a Divi Layout , it could be uploaded to new sites. The more you create your library of your favorite layouts, the easier you’ll be able to make new sites.
To store an element to the library, press the Library button that appears when you hover through any object within the page configuration bar. When an object has also been placed to the collection, new Divi layouts, rows, sections, and modules will be added to the “Add from Library” tab.

Okay, you’ve got the basics down there. It’s time to jump more now!
So now you’ve added the first rows, sections and modules to the website page. You’ve changed their settings and started creating and customizing your concept design. You’ve learned the concept down, but there was so much more to discover. We have hundreds and hundreds of tutorials covering every aspect of Divi. I urge you to go back to the main supporting documents page and read every last one of them. By the time you’re finished, you’re going to be a master of Divi!
Expanding the ability of Divi with even more modules, child’s themes and layouts
Perhaps one Divi’s greatest strengths is its large community of developers and designers. On the Divi Marketplace, the developers of Divi have been creating and sharing incredible Divi tools, like custom Divi Child Themes, Divi Modules, and pre – made Divi Layouts. Adding Child Themes and Layouts is an excellent place to kickstart new websites and Divi Modules expand Divi ‘s ability by offering you more key elements.
Read also our full review of Divi Page Builder plugin here >>


0 Comments